Web Browser Tools: Getting Started
Posted: 7/10/2020
Topics covered
- Developer tools
- The box model
- Document Object Model - DOM
- External resources for more information
Web browser tools are natively built in to any web browser
Web browser tools, or DevTools as Google calls their offering, are essential tools that all web developers should know how to use. Web browser tools are built into nearly every browser. They allow you to see live code from any website on the internet, and quickly create changes when designing updates to a user interface. The flexibility they offer allow you to quickly make changes to the color of a button, change text or font, or shift the layout of a screen for the purposes of sharing with others to gain feedback. Utilizing web browser tools to quickly generate mockups greatly reduces the turnaround time of creating new pages on a website. In addition, you can manipulate the pages compiled CSS, HTML, and JavaScript, and not worry about breaking the website. This development lifecycle is much more flexible than publishing to a test server, and refreshing the screen to see the changes. If you are purely editing the user interface, there is no better way to achieve this than through web browser tools in your preferred web browser. For me, that browser is Google Chrome, so that is the example I will stick to in this blog post.
Note: Web debugger and web browser tools, are referring to the same thing in this blog post, and I may use them interchangeably as I write.
Accessing developer tools in your web browser of choice
F12 is the default browser tools keyboard key for any web browser (Google Chrome, Microsoft Edge, Firefox, Opera, etc.). Pressing this key will launch the web debugger shown below.
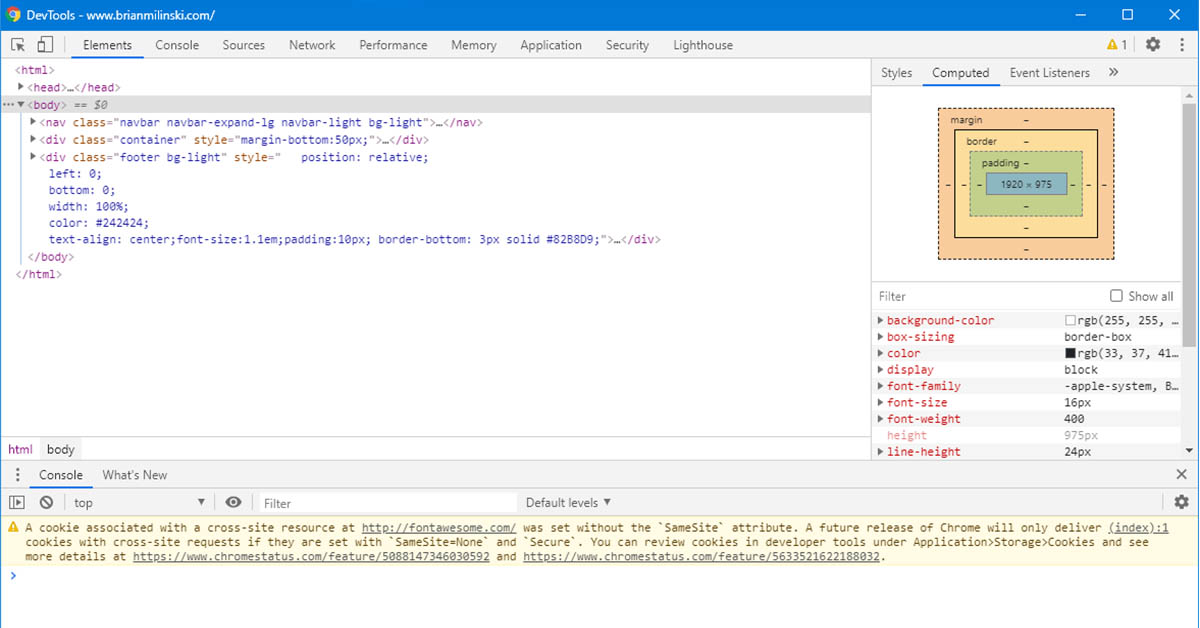
DevTools Window - Google Chrome
With the browser tools open, you can easily see all of the code required to build the website you are viewing; pretty powerful. To be clear, it is the front-end computed code you will be seeing, and if the website runs server-side code - this "background" code won't be present in the computed code. This is still extremely powerful information, as the web is not constructed in a vacuum. Often, developers borrow from other websites for inspiration and the inspector tool can give you insights on how to achieve something you may find useful without reinventing the wheel. The beauty of an open web is we can all learn from each other.

Document object model - DOM
The technical name for the code you can view in the web debugger is called the DOM, or the document object model. The document object model is how the structure of a website is defined, before it is compiled and interpreted by the web browser and displayed graphically to the end user. After the web browser interprets the DOM, you get the aesthetically pleasing websites you see across the internet.
The box model
The colorful box on the right-hand side of the browser tools window screen shot above (displayed below this paragraph), is referred to as the box model. Using the inspect tool and clicking on an object on the screen - you can see the computed CSS, as well as the attributes applied to the object. This is useful when checking on margins and padding for an object, or to find size and height attributes. The position of objects on the screen is essential for an effective user interface and this is one of the most important items to understand as a front-end web developer.
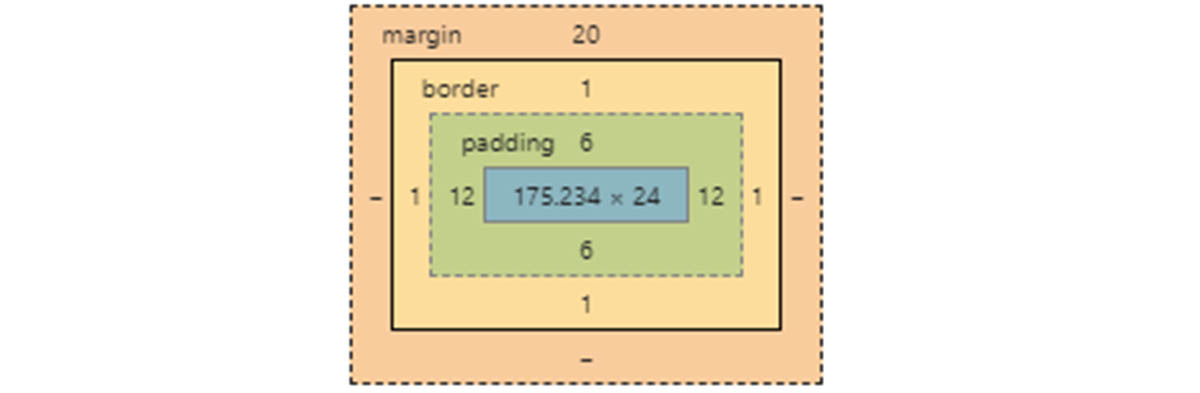
Key terms when discussing the box model - defined by their color coded sections
- Margin (orange) - the space between the current object you are inspecting, and others around it.
- Border (yellow) - the size (if any) of the border given to an element. Buttons for example usually have a border to define the button element graphically on the screen. Borders usually are 1 to 5 pixels for most designs.
- Padding (green) - the extra pixels added to an object around the defined element. For example, text can have padding to give it some room around it, which would be different than the margin. Padding is used to give space between the element and its border (if it has one).
- Width x Height dimensions (blue) - the dimensions of the native element are displayed at the center of the box model object, and represent the size of the element without padding, a border, or a margin.